Inspired by the Work of John Martin Bell ’08
Activity Guide by Cally Carr, VISTA service member
In this activity, we are going to work on creating our own creatures. There are creatures all around us and each one has a unique design. Perhaps you have a pet at home to play with or maybe you can see the countless animals and insects around your neighborhood. We can also imagine and create our own creatures with a design that we make up. Using pieces of nature and common household objects, we can create any design for a creature that we want!

About John Martin Bell
John Martin Bell is a multimedia artist that plays with the notions of vitality in nature, shapes, and forms of animals, and capturing a sense of liveliness. Bell is heavily inspired by the works of bird expert and painter, John James Audubon and Looney Tunes animator, Chuck Jones. Bell describes his sculptures as a means to make fun of his own paintings, two sides of the same artistic coin.

Take a look at the image above of John Bell’s sculpture, Tom Turkey. This sculpture, along with his others, is made from found wood, meaning Bell has not shaped or altered the wood to reflect the likeness of a turkey, but instead has looked into a piece of wood and found a turkey. He enhances the depiction by adding paint to create colorful details.

The image above depicts John Bell’s sculpture Rat. Again, Bell examines natural objects such as wood and bone to find the shape of his sculpture and uses oil paint to add details. Have you ever seen a rat that looks quite like the one presented above? Maybe not, but that’s part of the fun! When making our creatures, we can choose to depict our art realistically or more abstractly. Tom Turkey is an example of a more realistic sculpture, meaning it attempts to look similar to how turkeys look in real life. Rat is an example of a more imaginative sculpture, meaning that it does not necessarily look how we think rats normally appear in real life. When creating your creature, think about if you would like to make it more realistic or imaginative.
Finding Materials

You will need to find some materials to help bring your creature to life. The image above shows some of the natural objects I collected to help create one of my creatures. I would recommend going out to explore your yard or hunting through your recycling bin (be mindful of sharp edges!) to find objects that speak to you. Sticks, leaves, rocks, flowers, fabric scraps, bottles, paper, and tubes are all great staple pieces to use.
Take the time to study your object and see what the shape suggests and how they might interact. While out on a walk, I found a piece of driftwood that reminded me of a strong elk and a few blocks later I stumbled onto some flowers that jutted out in many different angles, just like antlers. Does that rock remind you of a frog? Do those flowers reminded you of dragon scales? Maybe the curves on a leaf remind you of a bat’s wings. Would that box, tube, and fabric make a good elephant if they were glued together? These are all good questions to think about while you look around for objects. One of the great aspects of creating your own creature is that you get to decide how to make it and you can use any material!
Design Your Creature
Spend some time thinking about what your creature looks like. Maybe you want to look through some books to learn about creatures and their characteristics. You could also draw out what you want your creature to look like.
Building
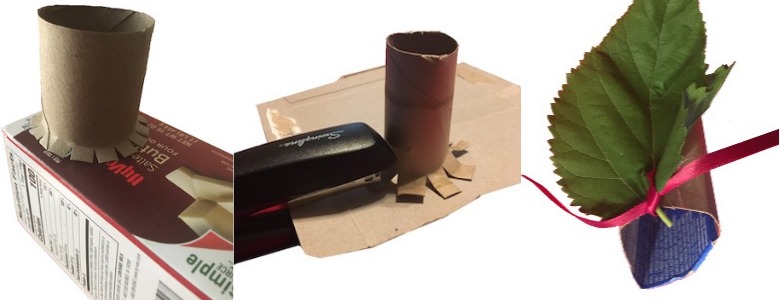
Putting together your materials to create your creature can be a little tricky. One trick that I would recommend using for putting two objects together is making a base or wide surface area so that your glue or tape has more room to stick onto. You can also use wire or string to bind objects by poking a hole and tying the objects together like in the image on the right.
Take a look at the images on the left and center. Notice the flanges or small cuts on one end of the paper roll. When these cuts are folded over, they create a flat base for the glue/tape to lie on so that it will stick better to the other object. Flanges are also a great way to create a base to staple onto.

The cut and fold technique can be used to help your creature balance as well. Notice in the image above that I have made some slightly large cuts into my paper roll and folded them back to create a large, flat area.
Working with natural objects can be a little more difficult since some objects like rocks don’t really like to change shape, while other objects such as flowers can easily fall apart. On the other hand, working with natural objects can be exciting because they can take on such beautiful forms. Likewise, objects such as a rock will really make you think deeply to find the form within the object instead of molding it to take on a shape you want.


Here are examples of my creatures made out of both natural and household objects. For the first creature, I used my wood to find the shape of the body. I noticed a dark ring on one end on my wood that reminded me of a nose, so I used that side to create the face and cut up a flower petal to create the bright, orange eyes. Then I glued my jutting flowers alongside the face to create antlers.
For the second creature, I only used a cardboard box, a paper roll, and some paint. The eyes, ears, mouth, fangs, and long tongue are made up of scraps from the box I used for the body. The legs and tail are cut from a paper roll and then I added details with paint.
World-Making
Creatures live all over the world, in many different types of environments, and some of them even travel around from one area to another. Once you finish building your creature, think about what kind of environment it might live in. Does your creature like the beach or snow? Forests or cities? Does it soar through the sky or dive deep underwater? Try drawing or painting the environment you think your creature would live in. You could even take a box to create a diorama for your creature. You can make as many environments as you want! Need some ideas for your background? You can look at some art for inspiration! Here are two examples of watercolor paintings I did as environments for my creatures.


Writing Exercise
Write a description of your creature and when it lives. Think about the textures and colors of your creature and how you might describe them. What sort of food does your creature eat? Does your creature go to school? What kind of games does your creature like to play? You can even write a story about an adventure that your creature goes on!
Web support:
Daniel Strong
Associate Director and Curator of Exhibitions
Grinnell College Museum of Art
and
Rick Johnson
Student Assistant
Grinnell College Museum of Art