Tilly Woodward
Curator of Academic and Community Outreach
Grinnell College Museum of Art

Make the Cover
We will start by making a cover.
You will need two pieces of paper.
One should be smaller than the other by about a finger width all the way around.

Step 1
Glue the smaller paper to the backside of the bigger paper.
Glue sticks work well and are easy for kids to use.
If you don’t have glue sticks, you can use a stiff paint brush and white glue. Apply a very thin coat or your book will turn out lumpy.

Step 2
Apply glue to the inside cover paper.
Turn it over and position it so the border of the outside cover paper is even all the way around.
Press the papers together to help the glues adhere.

Step 3
Fold all four corners of the cover paper over the inside cover paper, forming triangles.
Cut the triangles off.

Step 4
Apply glue to all four sides of the exposed edges of the outside cover paper, making sure the glue goes all the way to the edges. It’s OK to have a little glue overlap onto the inside cover page, but not too far.

Step 5
Fold each glued border over onto the inside cover paper, and press it down firmly and give it a sharp crease.
Take care to make sure your fold is straight and the outside cover paper comes all the way to the edge of the inside cover paper.

Step 6
Match up the corners of the cover and press the fold, making a sharp crease.

Add the Pages
Step 1
Match of the corners of the pages, and crease the fold. 10 paper will give you 20 pages. If you have a lot of pages, you may want to fold the papers in sections rather than all at once.
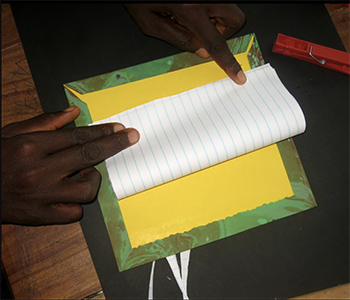
Step 2
Open the book cover and place the pages inside.
There should be a small border of cover all the way around the pages.
When you have the pages in positions, secure them with at least 2 clothespins on opposite sides.
If you don’t have clothes pins, use paper clips instead!

Step 3
Place the book on top of a piece of wood. Use a hammer and a nail to make 3 – 4 evenly spaced holes in the crease of the fold.
You don’t need to hammer down far into the wood- just far enough to get through all the pages and the cover. If you have trouble hammering, get someone to hold the nail with a pair of pliers while you tap on it.
If you don’t have a hammer and nails, use a push pin to make the holes!

Step 4
Measure and cut thread or thin string against the length of the book.
You will need a little more than double the length of the book.
Thread your needle so you have one long, single strand.

Step 5
On the inside of the book, insert the needle in the first hole and sew through to the outside of the book.

From the cover side of the book, sew up through the second hole.

Sew down through the third hole on the page side of the book.

Sew through the 4th or top hole from the cover side of the book.

Sew back through the 3rd hole on the page side of the book.

Sew back through the second hole on the cover side of the book.

Step 6
Your thread should meet up at the first hole on the page side of the book. Tie a knot twice and clip the threads. Sometimes it helps to have someone put their finger on the first knot while you tie the second knot.

Fill Your Book
Now your book is done.
The next step is to fill it with drawings, stories or homework.
It is a place for you to express things in your heart and mind that are important to you.
Share your stories and drawings with people you know!

Web support:
Daniel Strong
Associate Director and Curator of Exhibitions
Grinnell College Museum of Art
and
Donna Dralus
Content Specialist - Digital
Grinnell College